
There are two ways to accept new test booking for a patient.
1. By clicking on the Accept Test button on the Main window.
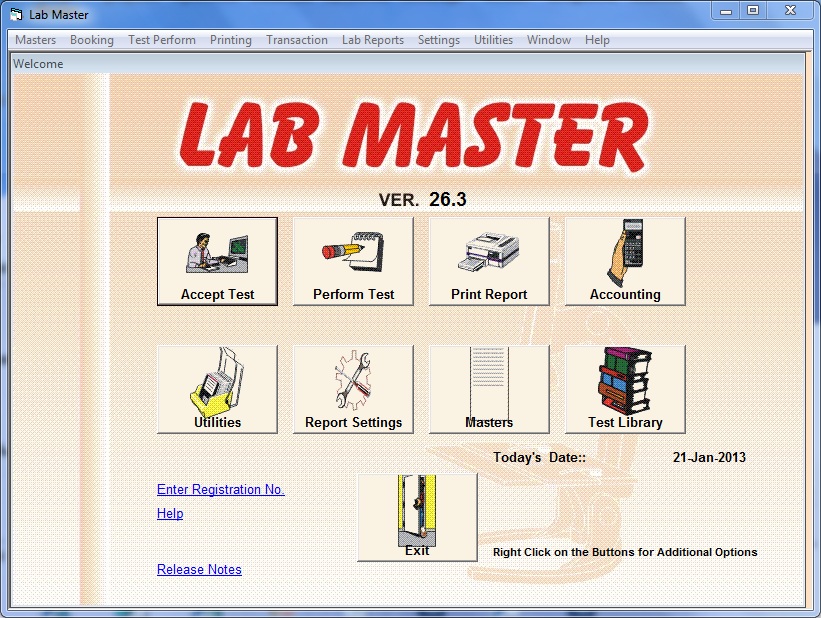
2. By choosing Accept Test Booking from the Booking menu on the menu bar.
The following window will appear when you choose either of the two option.
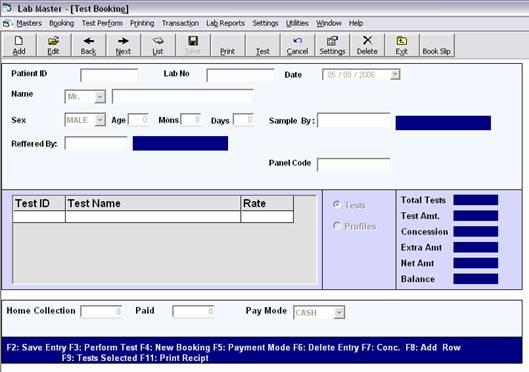
To accept new test booking click on Add button (Alt+A) or press F4 button. The fields below gets highlighted. Now you can enter the details of the patient. Add the tests and then save the record by clicking on the save button.
Patient Id: This field contains Patient Id for the patient you can also change the Patient Id if you want to. Patient Id uniquely identifies a patient. If the patient has visited the lab before and you remember his patient id you can enter that patient id in this field.
Lab No: This field contains Lab Number for the patient. This number is automatically generate for each booking but if you want to change this number you can do so. This number identifies a test booking uniquely.
Date: This field contains current date as default you can also change the date if you wish to.
Name: Enter the name of the patient in this field.
Sex: Enter the Sex of the patient in this field. You can also choose for the combo box.
Age: Enter the Age of the patient in this field. If you want to enter age in months and days you can also do so.
Sample By: If the sample is taken by some body other than the lab in which the test is to be done. You can enter such details in this field.
Referred By: Enter name of the doctor, by whom the patient is referred, in this field.
Panel Code: Enter the panel code in this field.
Test ID: When you reach this field enter the Test Id for the test. If you don’t remember the Test Id you can choose the test from list of test which you can get by pressing F1 when in this field or by entering any thing in this field and then pressing enter. The following window appears.

Select the department by moving to the particular department with the help of Up and Down arrows. On reaching the particular department, press enter to select the department. When a department is selected it is highlighted in yellow color with a star mark on the right hand side. You can select more than one department at a time. To change between the departments press F12.
After selecting the department, go to the test heads of respective department by pressing tab. You can move through the test heads with Up and Down arrows. After reaching the required test head press Right arrow to go to select tests field. Here you can move through the tests with Up and Down arrow and select the required test by pressing enter on the test. The select test gets highlighted with yellow color and a star mark on the right hand side. After finishing with the particular test head if you want to select test from another test head than press Left arrow to move back to the test heads. And select the required test head. This process of moving between test heads and test require a lot of effort. But there is another way to do this too. When you want to move through test heads just hold Ctrl and than press up and down arrow and when you want to move through tests just press up and down arrows.
After finishing with one department you can change the department simply by pressing F12 key. And repeating the process until you are done with selecting the tests. After selecting the tests press OK button of press F9 key to save the tests.
Note: You can also select profiles if you have created any.
Test Name: When you finish entering the Test Id the corresponding test name will appear in this field.
Rate: This field will also show the predefined rate for the test but you can change the rate if you want to by clicking on this field and entering the required value.
As you enter the details the accept test window will change significantly as follows.
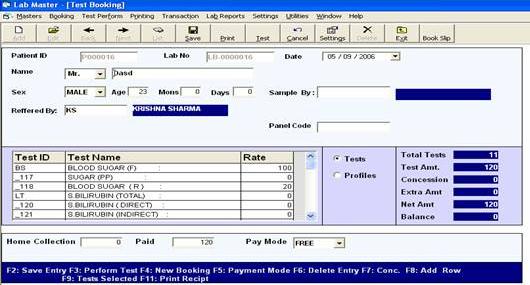
If part payment is made against this booking then you can enter the paid amount in the Paid field at the bottom. You can also select the mode of payment from Pay Mode combo box. After entering the details click on Save button to save the booking.